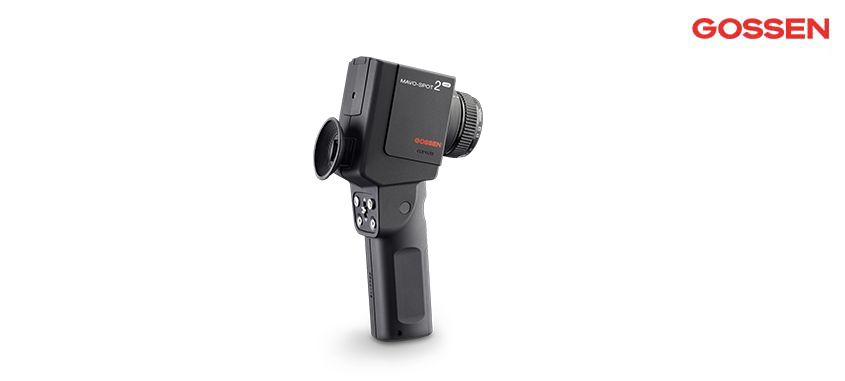
Mavo-Spot 2 USB
This high precision luminance meter
for distance measurement with an acceptance angle of 1° is assigned to class B in accordance with DIN 5032-7, appendix B of DIN EN 13032-1 and CIE 69.It measures the perceived brightness of back-lighted surfaces in candelas per square meter (cd/m²) or foot-lamberts (fL) in consideration of ambient light.
Is equipped with an excellent adaptation to the spectral brightness sensitivity of the human eye V(λ) and is highly precise with a minimal deviation of just f1‘ < 3 %, which is significantly better than specified in the standard. By means of the mirror reflex optics, the measuring subject may be targeted precisely in a 15° field of view and a sharply marked 1° measuring circle in the center of the viewfinder. Focus can be set for distances ranging from 1 meter to infinity. Shorter distances as of 34 cm are made possible by means
of optional close-up lenses. Alternatively, contact measurement can also be performed with an optional, top quality probe. The velvety coating on the adapter disc prevents scratching of self-luminous and back-lighted surfaces.
Measurement functions are selected and measurements are started with convenient on-hand operation. The display on the viewfinder is activated along with back-light by simply pressing a key. The comparative and ratio measurements are especially advantageous, by means of which deviation of measured value B from reference value A is evaluated and displayed. The relationship A/B is used for contrast measurement at workstations. Percentage deviation %A allows for an assessment of the consistency of monitor screens and projection screen lighting, and difference A-B is used to detect deviation during the production process. Special tests for proving and observing norms and standards for quality, general safety, work protection, as well as safety on monitors in the field of medical diagnostics and office technology may get its documented evidence by means of our factory Calibration Certificate. Depending on how the meter is used, we recommend a calibration interval of 12 to 24 months.
| Technical Data | |
| Illuminance [Lux] | 0.1 … 99 900 lx optional reflection standard, classified |
| Luminance | 0.01 cd/m² … 99 990 cd/m² / 0.01 fL … 30 000 fL |
| Measuring ranges | 4 |
| Measuring ranges selection | Automatic/Manual |
| Measuring rate | 2 per second |
| Measuring method | Distance measurement with 1° measuring angle, |
| 1 m up to ∞, optional contact measurement with measuring probe | |
| Measuring sensor | Silicon photocell with V(λ) filter |
| Measured value memory | Up to 1000 individual values or 10 groups with 100 individual values each (switchable) |
| Error limit – V(λ) adapted (f1‘), typical | < 3 % |
| Error limit – overall error, typical | ≤ 8 % |
| Accuracy | ±2.5 % of read out ± 2 digit |
| Battery | 2 x 1.5V mignon , Type AA |
| Automatic shutdown | 30 s |
| Battery service life | Approx. 5000 measurements |
| Voltage supply | USB |
| Display | multifunctional LCD |
| Controls | 4 keys, 1 slide switch, 1 DIP-switch |
| Interface | USB 2.0 |
| Software | GLUX 2 |
| Operating temperature | 0 °C to 50 °C |
| Dimensions | 190 mm x 90 mm x 57 mm |
| Weight | 400 g without battery |
| Delivery content | Aluminum case, GLUX 2 software, eyecup, lens cover, USB cable, battery, |
| operating instructions, calibration protocol | |

